DIY Bird Feeder for Attracting Bluebirds
Updated: Mar. 21, 2024

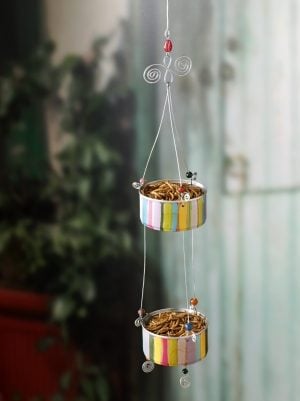
The best secret for attracting bluebirds? Offer mealworms! This DIY bird feeder made from recycled tuna cans is perfect for the task.
Attracting bluebirds is easy when you offer mealworms. There’s no need to buy an expensive feeder, though. This DIY bird feeder made from tuna cans costs less than $1 to make. You just need a few supplies and tools. Then hang it in a tree, and wait for those blue beauties to arrive.
Materials:
- 2 recycled cans (tuna or cat food)
- 16- and 18-gauge wire
- Beads
- Paint
- Needle-nose pliers
- Drill
Step-By-Step Instructions:
Step 1
Clean out your cans and let dry. Drill three holes in the shape of a triangle on both the bottom and rim of each can. Be sure the holes on the top and bottom line up so your feeder isn’t crooked.
Step 2
Paint or decorate your cans any way you like. I used acrylic paint in many layers, allowing the paint to dry. Then I accented with a gold color metallic pen. You can also use spray paint or permanent markers to create your own unique design.
When completely dry, spray the painted cans with a little bit of matte finishing spray.
Step 3
Cut the wire that will hold the two cans together. Cut six pieces, 9 inches long, of 18-gauge wire. Insert the wire into the rim of each can and twist a few times, leaving approximately 3 inches for decorative curling and 6 inches for hanging. Leave unattached for now.
Step 4
Create the hanger portion of the feeder by cuting about 12 inches of 16-gauge wire. Make a small loop at one end, and then fold the wire over to make a hook. At the other end, create an eyehook. Depending on where you will be hanging your mealworm feeder, adjust the length as needed.
Step 5
For the decorative element under the hanger, cut a 12-inch piece of 16-gauge wire to loop and curl. Fold the wire in half, and make a loop at both ends in a figure-eight formation. Cut the remaining ends to the same length and curl. Attach this piece to the hanger by creating an eyehook at each end of a bead and attach the two pieces together.
Step 6
Attach the cans together. Start with the bottom can. Place a bead on each stem, insert the excess wires into the top can and make a small loop at the end of each one. Do the same with the top can, attaching the excess wires to the hanger.
Step 7
You can add swirls, beads and any other decorative elements to the bottom of the second can. Using 4-inch pieces of wire, insert them through the bottom of the can and decorate as desired.
Finally, it’s time to hang the feeder and add the mealworms. In no time at all, you’ll be attracting bluebirds from all over the neighborhood!