DIY Teacup Bird Feeder
Updated: Mar. 21, 2024

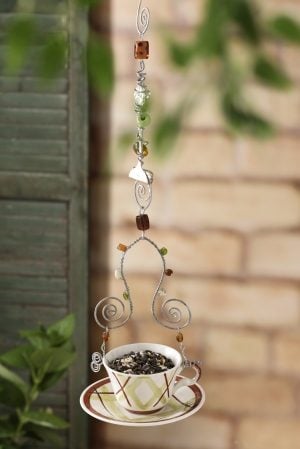
Have a cuppa with the birds when you create this homemade bird feeder from an old teacup and saucer.
Re-purpose a mismatched or slightly damaged teacup and saucer by turning it into a bird feeder. You can easily customize this project with the beads or other accessories you choose. It can be as basic or as intricately detailed as you want! It’s practical, too. Watch the birds as they perch on the rim of the cup. As a bonus, the saucer catches most of the discarded seed shells.
Materials:
- Cup and saucer
- Spoon or fork
- 14- and 19-gauge galvanized wire
- Drill with tile drill bit
- Nut and bolt (depends on the size of drill bit you are using)
- Needle-nose pliers
- Beads (about ten 6-10 mm beads and four more beads with a larger hole)
- Hammer
- Safety goggles
Step-By-Step Instructions:
Step 1
Drill a hole on the side of the teacup opposite the handle. Use the tile drill bit, but drill slowly and apply minimal pressure to avoid cracking the cup. Next, drill a hole in the center of the cup bottom and center of the saucer.
Step 2
Cut two pieces, about 10 in. each, of 19-gauge wire. Fold each piece of wire in half to make a small loop. Hold the loop with the pliers and twist about five times to make a hook at the top. Leave about 4 in. of wire on each side.
Step 3
Insert one of the wire ends into the hole in the cup from the inside out. Make the loop tight so that it rests on the rim. Twist the ends together to close the loop. Coil the excess with the pliers.
With the second piece of wire, make another small loop, which will sit on top of the cup’s handle. Try to make it about the same height as the other one. Depending on the placement of the handle, you might need to make more twists. Once they’re close to the same height, wrap the excess wire around the handle.
Step 4
Take 16 in. of 14-gauge wire and fold it in half to make a V. Using the pliers, coil the ends into swirls, leaving the V about 4 in. on each side stemming from the center. Press the piece by laying the wire on an anvil or hard surface and flatten with a hammer. This will prevent the wire from uncoiling. Add beads to the V by wrapping 19-gauge wire around it, adding a bead every three to five wraps.
Step 5
For the attachment pieces, use three pieces of 19-gauge wire and two beads. Thread one bead and bend two eyehooks on each end. Repeat for the other two wires. Attach one end of each attachment piece to the swirls of the V. Attach the other ends to the hooks at the top of the cup.
Step 6
Attach the saucer to the cup using the nut and bolt. Gently tighten, being careful not to crack the cup or saucer.
Step 7
Flatten the bowl of the spoon using a hammer. To roll the spoon to use it as a hook, gently tap the tip of the bowl. It will start folding or rolling, depending on the material the spoon is made of.
Step 8
Cut a 38-in. length of 14-gauge wire and make a swirl at one end. Press the swirl with a hammer so it doesn’t uncurl. Insert the opposite end of the wire into the fold of the spoon. Wrap the wire around the spoon a few times and add beads. When you get to the top of the spoon, there should be about 4 to 8 in. of wire left. At the end, make a hook with the pliers. Start by making a small loop, and then make a U at the end. Press this hook.
Step 9
Connect the spoon hanger to the rest of the feeder using the attachment bead. Now you’re ready to hang it and add some birdseed!