
DIY License Plate Dragonfly Project Idea
Updated: Apr. 02, 2024
Repurpose found or discarded items into a funky DIY license plate dragonfly garden art project for your backyard.
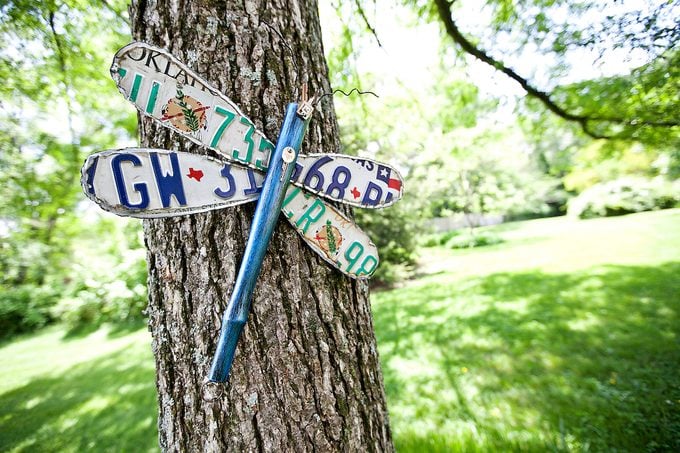
Tina Burrows of Roff, Oklahoma, shared this unique license plate dragonfly project with us. She and her husband, Steve, enjoy finding discarded items and giving them new life by turning them into DIY garden art. Tina suggests that you look for old license plates and chair parts at garage sales and thrift stores, or ask family and friends. See more of Tina’s creations at repurposed-life.com.
You can hang the dragonfly on a tree or fence, or use it indoors for a rustic and unique wall hanging. Get creative with paint colors for the body and materials for making the antennae and tail. And get the kids involved! They can paint the body, name the dragonfly and help find a place to hang it.
Check out fascinating dragonfly facts you should know.
License Plate Dragonfly Materials:
- Paint
- 1 chair leg or spindle
- 4 license plates
- Old keys, 1 key ring, heavy-gauge wire (or other decorations)
- Seven 1-in. multipurpose screws (or more as needed)
- Picture hanger
- Marker
- Safety gloves
- Metal file
- All-purpose aviation snips or cutting torch (see crafter’s note)
- Drill
Crafter’s Note: Aviation snips are sold at home improvement stores. Older license plates may require a stronger tool, such as a cutting torch. Be sure to wear safety gear.
Backyard Tip: If you don’t have a chair leg or spindle for the dragonfly’s body, try the handle of a hammer or a tall candlestick.
Here’s another super simple dragonfly DIY yard art project idea that you can make with copper wire.
Step-By-Step Instructions:
Step 1
Step 2
Create a pattern for the wings. This dragonfly has 9½- x 4-in. wings. Trace the pattern onto the underside of each license plate. Trace two for the left side, flip the pattern and trace two for the right side.
Step 3
Wearing heavy gloves to protect your hands, use snips to cut out wing pieces along pattern lines. File down rough edges.
Step 4
Lay out the pieces, right sides up, as you’ll want them to look when attached to the chair leg (body). On the wrong sides, mark the top-right (TR), bottom-right (BR), top-left (TL) and bottom-left (BL) pieces.
Step 5
With wrong sides up, position the top-right piece (TR) beside the top-left piece (TL) on the body, overlapping slightly to form the upper set of wings. Drill 2 holes through both plates into the body. Repeat for the bottom set of wings.
Step 6
Attach the wings to the body, using 4 screws.
Step 7
Use remaining screws to attach keys or other decorations to your dragonfly. Ours has keys for the head and eyes, and antennae of heavy-gauge wire drilled into the top. Attach a key ring with key to the bottom to decorate the tail.
Step 8
Attach a picture hanger to the underside and hang the dragonfly in a prominent spot.