
DIY Recycled Garden Sign

Updated: Mar. 21, 2024
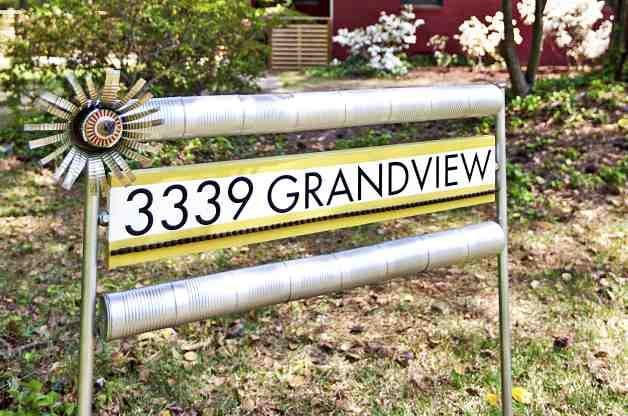
Put your own personal touch on this project to create a recycled garden sign the whole neighborhood will love.
My husband and I are just finishing up a (very long!) renovation of a rustic 1950s rancher. I enjoy cranking up the volume on these outdated midcentury homes. So when it came time to design an estate sign for the property, I knew I wanted something with a clean, sleek feel that also reflected the home’s humble roots. I hope you agree that this tin can and conduit pipe recycled garden sign fits the bill.
Materials:
- 3-ft. x 6-in. wooden board (or desired size)
- 20 or more opened 16-oz. (or other same-size) tin cans with labels removed
- Two sections of ¾-in.-wide galvanized conduit for sign sides (desired sign height plus a couple of feet extra)
- Two 2-ft. sections of slightly wider galvanized conduit to secure in the ground 7-ft. or longer piece of 3/8-in.-wide threaded galvanized steel rod for the can rails
- Several nuts to fit threaded rod (enough to attach cans)
- Exterior-grade vinyl letters and numbers to fit board
- Cardboard scrap
- Sandpaper
- Paint and paintbrush
- Exterior non-yellowing spray sealer
- Cabinet knobs (optional)
- Bike chain (optional)
- Silver- or chrome-colored spray paint (optional)
- Colored plastic can or bottle top
- Wire tools
- Bolt cutters
- Nail punch and hammer
- Metal snips
- Drill press or vise and hand drill
- Electric drill with drill bits
- Plumber’s pipe cutter
Step-By-Step Instructions:
Step 1
Use bolt cutters to cut two pieces of threaded steel rod to fit the sign. Measure the length of your board (mine was 3 ft.) and then add 3 in. to each rod end. For instance, I cut two 3-ft.-6-in. rods to make the can rails for my sign.
Step 2
Trace the open end of a can onto scrap cardboard and cut out. Mark the center of the cardboard circle and punch a hole. Use this as a template to mark the center on the closed end of all the cans with a marker. Then use a nail punch and hammer to make a hole on each marked spot. The hole should be wide enough to fit the threaded steel rod.
Step 3
From the other rod end, slide on a can, closed end first, until it rests in the open end of the first can. Thread a nut until it reaches the bottom of the previously placed can. Align cans and tighten the nut. Repeat until all cans are secured together. I used about 8 cans on each rail. Use enough cans so that 3 in. of rod remains at both ends when done.
Step 4
To cover the open end of the rail, use metal snips to cut 2 in. up the sides of the can’s perimeter. Then squeeze the can’s slit sides, open end first, into the last can on the rod. Thread a nut against the bottom of the can to secure.
Step 5
Repeat Steps 3-5 to make the second rail of cans using your other steel rod piece.
If desired, spray-paint the tin can rails and conduit sections.
Step 6
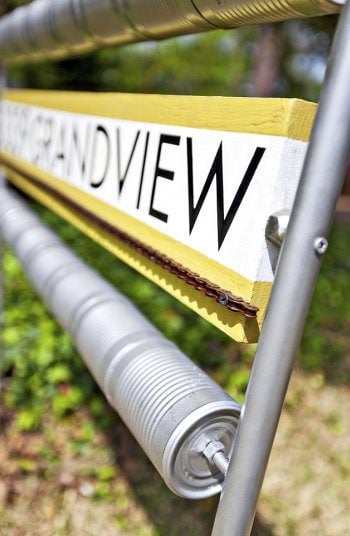
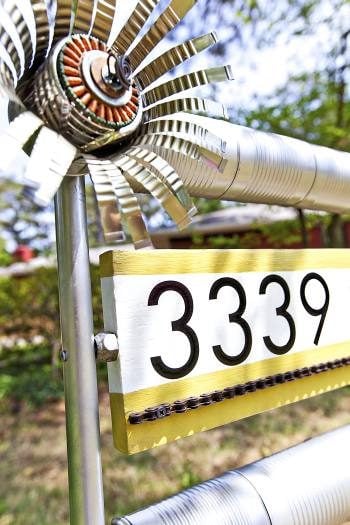
Sand the board and paint it in your choice of color(s). Let dry completely. Then apply vinyl letters and numbers as desired to the board.
Step 7
On a flat surface, lay the can rails and the board so they are spaced exactly as you want them to be in the finished sign. I used a couple of blocks of wood to raise the board to the same level as the rails.
Step 8
Cut the two sections of conduit to your desired sign height plus a couple of feet. Then lay the equal sections on each side of the rails and board. Mark holes on the conduit sections where you want to attach the rails and board. Be sure to mark both sides the same. I used one screw centered on each side to attach the board, but you may want to use two equally spaced screws for stability.
Step 9
Using a drill press or vise and hand drill, make holes in the conduit sections where marked. For the rail holes, don’t drill all the way through. For the board sign marks, go all the way through the conduit section. I used 2-½-in. drywall screws and made my drill holes slightly larger than that for the sign.
Step 10
After drilling, lay the conduit sections beside the rails and board again. Insert the threaded rods on the rails into the appropriate holes. Then attach the board, using a nut as a spacer between the board and conduit section.
Step 11
For a more finished look, attach cabinet knobs to the top of each conduit section. You can also add a bike chain under the address.
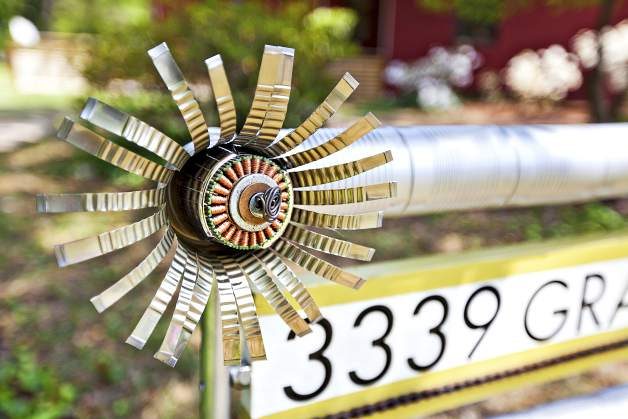
For the flower, punch a hole in the bottom center of a can. Use metal snips to cut slits about 3/8 in. wide, ending about 1 in. from the bottom, all around the can. Curve slits outward like flower petals. Drill a hole in the top center of a colored plastic cap (like that on a spray-paint can). Use recycled materials like colored wires and washers to decorate the top. Curl the end of the wires through the cap hole. Use a length of wire to attach the decorated plastic cap to the can bottom with cut petals. Then secure it to the sign.
Step 12
Coat the entire sign with spray sealer and let dry.
To secure the sign in the ground, hammer two 2-ft. lengths of wider conduit into the ground and slide the sign conduit sides down into them.
Originally Published: December 12, 2013