
If you’re anything like me, you’re always looking to extend the seasons of color in your garden. This year, instead of planting twice — mums for fall color and bulbs for early spring blooms — plant pansies once for two to three seasons of color! Advancements in the garden industry have created new varieties of spreading and trailing pansies that are even more tolerant of cold temperatures and frost. So northern gardeners, up to USDA Hardiness Zone 5, can overwinter pansies for a burst of color again in the spring.
Can Pansies Survive Frost?
In fact, these hardy annual varieties are able to withstand light frost. When planted in fall, these pansies will return in spring along with colorful bulbs, and for some gardeners in the South, pansies can bloom throughout mild winter months!
Here’s how to overwinter begonias as houseplants.
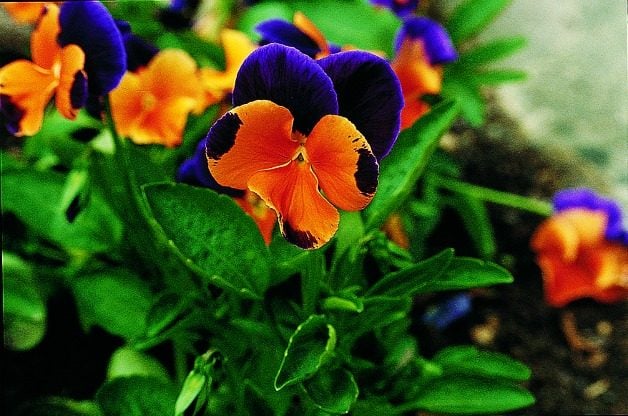
Cool Wave Pansies

Zones 5 to 9
Beautify the growing season with cool-season pansies. With delightful color and a spreading and trailing growth habit, they’re perfect for spring and autumn containers. One of the first plants you see in spring, it’s among the surest signs that winter is on its way out.
Why we love it: These colorful pansies bloom for a long time. That’s just one of the benefits of the Cool Wave brand.

If you’re interested in digging in and planting pansies this season, here’s a simple list of Do’s and Don’ts for overwintering.
- Do — Plant pansies in a location with full sun during the fall, winter and spring. Pansies can be planted in containers and hanging baskets, but be sure to transplant into the ground for overwintering.
- Don’t — Worry about protecting pansies with straw or branches when temperatures start to drop. Pansies are resilient, and will withstand frost and will still overwinter if left uncovered for the winter.
- Do — Check to make sure where your home falls within the USDA Hardiness Zone. These new pansies won’t overwinter north of Zone 5. You can find out your location here.
- Do — Enjoy your pansies until the heat strikes, usually into mid-May in the South and into June in the North.
When it comes to choosing plants with the most long-term benefit to the birds in your backyard, you can’t go wrong with native trees. Trees offer a whole buffet of food options in the form of seeds, fruit, nuts, sap, nectar, leaves, pollen and insects. If you don’t have many trees in your yard, try these suggestions for the best trees that attract birds.
Take stock of what you have. Make note of the trees in your yard. Decide which existing trees provide shelter, breeding sites and food, and then remove any that don’t make the grade—especially if the tree is unhealthy, unsightly or unsuitable for your yard.
Determine which wildlife attributes are still lacking and what types of trees will help fill those needs. The number of trees will vary according to your space, but a good rule of thumb for an average-sized yard is one or two large trees, at least one grouping of smaller trees and shrubs, and one clump of conifers for winter shelter.
Never plant these invasive shrubs (and what to grow instead!)
Choose Trees That Attract Birds
When selecting trees, pick species that are compatible with your climate, specific soil type and light conditions. Also check what size the trees will be when fully grown, and make sure they will not overwhelm the allotted space.
Not all trees flower or produce food at the same time of year, so the more types of trees you have, the more enticing your yard will be. Keep the buffet coming by offering both evergreen and deciduous trees with overlapping blooming and fruiting cycles.
For example, in spring, dogwood offers insects and buds for birds to eat, and is a host plant for many butterflies in the blues family. Serviceberries (Amelanchier) provide June fruit, while mountain ash (Sorbus), fringe tree and magnolia follow with fall fruit offerings. Hollies and hawthorns bear fruit in fall that persists into winter and often through early spring.
Check out 5 ways to create a bird-safe backyard.
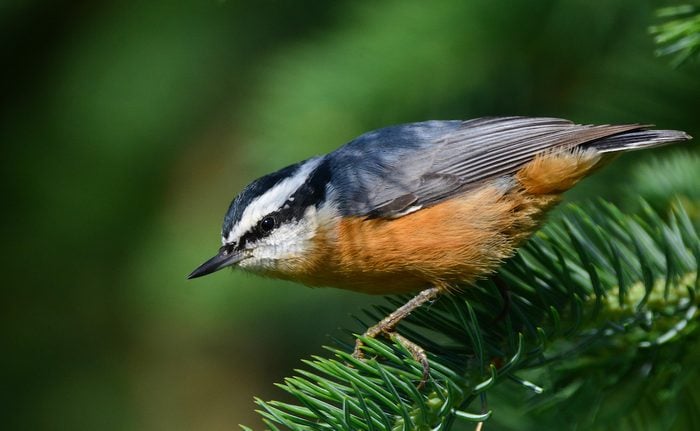
Birds like finches, juncos and nuthatches favor seeds. Seed-producing trees include redbuds and maples, along with the seed-filled cones of spruce, fir, pine and hemlock.
Even sap from trees like oak, birch and maple can be a feast for some winged wildlife, especially butterflies like mourning cloaks, anglewings and wood nymphs. And any insects attracted to the sap may become a meal for nuthatches and other insect-eaters that search nooks and crannies for grubs, ants and other bugs.
Not all trees are created equal when it comes to attracting birds and other wildlife. But if you carefully select the trees you plant, you can feed a variety of birds, along with shelter and places to raise young. So give these trees a try. Remember to do a little research to find the species or cultivars that will thrive in your climate and soil conditions.
Check out 7 things you need to know before planting a tree.
Best Trees to Grow for Birds and Wildlife
Maple (Acer)
Birds and small mammals devour the seeds within the winged samaras of maples. The leaves also make these trees host plants to almost 300 butterfly and moth species.
Birch (Betula)
Many birch species have beautiful white, black or tan bark, and their conelike strobiles are a food source for birds and small mammals. Birch is the host plant for more than 400 species of butterflies and moths.
Spruce and Pine (Picea) and (Pinus)
Spruce and pine offer excellent year-round shelter and produce seed-filled cones that beckon birds and small mammals. Pines are the host plants for more than 200 butterflies and moths; spruce for more than 150.
Poplar (Populus)
Songbirds, waterfowl and small mammals love to feed on the cottony seeds of these trees, and more than 350 butterflies and moths eat its leaves.
Cherry, Plum and Chokecherry (Prunus)
The fruit ranges from tiny black cherries to inch-long American plums, and songbirds, ground birds and mammals of all sizes relish it. More than 400 moths and butterfly species eat the leaves.
Oak (Quercus)
The acorns feed everything from squirrels and deer to wild turkeys and black bears. More than 500 butterflies and moths are attracted to this host plant.
Willow (Salix)
Willow seeds feed a wide variety of songbirds, waterfowl and small mammals. The trees are host plants for more than 400 butterflies and moths.
Next, learn how to grow native ornamental grasses for birds and butterflies.
“Why isn’t that bird eating the seed?” asked an 8-year-old boy as we watched a collection of bird feeders through a window. “He just grabbed a piece and flew away.”
It was late autumn, and nearly all the leaves were gone from the surrounding birches and aspens. The bird, a black-capped chickadee, had just made a very quick visit to a platform feeder, grabbed a black-oil sunflower seed from the heap and fluttered off into the snowy spruces. That youngster had observed something most people miss. I asked him what he thought the bird was doing.
“Saving it for later?”
This kid was a biologist in the making. He was right. The feeder was alive with birds coming and going. The boreal forest of interior Alaska that surrounded us was filled with the calls and chitters of boreal and black-capped chickadees, common and hoary redpolls, and a few musical notes of pine grosbeaks. The redpolls and grosbeaks lingered around the feeders, stuffing themselves in the near-freezing air.
But the chickadees came and went, came and went, never staying long. It was impossible to tell how many there were—maybe five, maybe 50. Back in the forest, the chickadees were stashing their seeds beneath the trees’ peeling bark, or tucking them into cracks in the wood. Ultimately, they would cache hundreds and hundreds of seeds like Easter eggs throughout their territory. And they have a remarkable ability to remember every hiding place.
What Kinds of Birds Cache Food?
Chickadees aren’t alone in this bird behavior. Birds such as woodpeckers, shrikes, jays, titmice and nuthatches display similar habits.
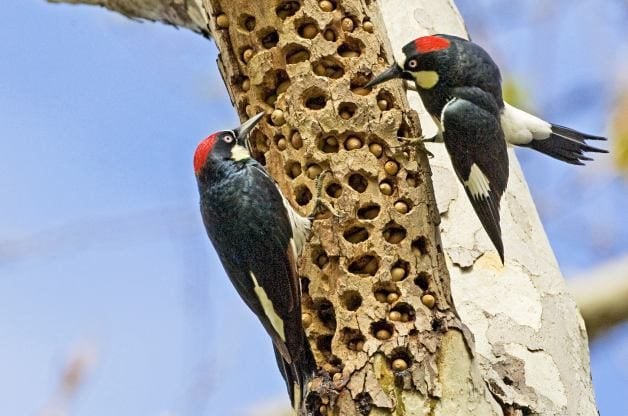
The acorn woodpecker has an especially fascinating—and labor-intensive—strategy. It gathers acorns and takes them to a single tree with many small excavated cavities. Then it places the acorns in the cavities—one per hole. The bird firmly taps each nut into its hole, but not so tightly that the acorn is difficult to extract.
The hitch in the system is that the nuts shrink as they dry, so they each must be transferred to a new hole. It’s a game of constant maintenance, with the birds continually moving back and forth across their cache adjusting seeds, moving them to new holes, and flying off to gather more. The season for finding acorns is short, and the woodpeckers make the most of it, gathering and stowing hundreds and hundreds of nuts over the course of a few weeks. Safely stored away, those acorns provide an important source of food over the rest of the year.
Shrikes Cache Their Prey
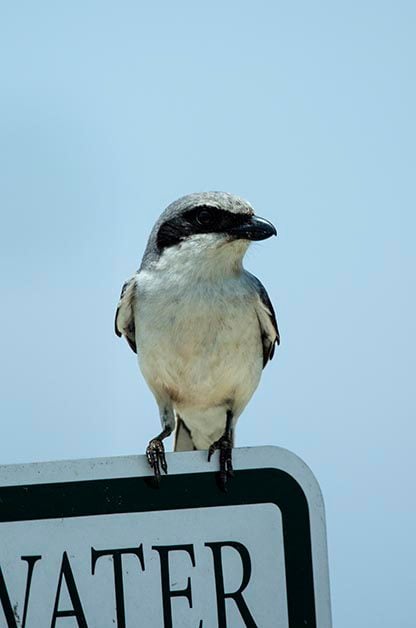
Far less delicate than the careful organization of acorn woodpeckers is the gruesome behavior of northern and loggerhead shrikes. These two species, which look much alike, are often mistaken for mockingbirds or jays. Medium in size and gray, black and white in color, they tend to be overshadowed by flashier species.
Look closely at a shrike, however, and some more sinister features appear. Its eyes are large, sharp and black, seeming to point forward, like a predator’s. The bill is long and strong, its tip armed with a nasty down-curving point, much like a hawk. These features betray the shrike as something more than the songbird it resembles. Shrikes are fierce predators. Using their sharp bills, they hunt small rodents, insects and other birds. But it isn’t their hunting skills that have earned them the nickname of butcher bird.
Recently, I was camped along a wild, remote river in the Arctic National Wildlife Refuge of northeastern Alaska. Tall willows surrounded my camp. Every day, I watched a pair of northern shrikes fly through the trees. Late one evening, I saw one of the pair fly across the river, returning a few minutes later carrying a dead vole in its feet. Soon it flew past again, unburdened, across the river. Ten minutes passed and it was back, another vole clenched firmly in its feet. In all, I saw five trips back and forth and five freshly killed voles.
The next day I wandered back into the willows where I assumed the birds’ nest was hidden. I didn’t find the nest, but I did find a dead vole impaled on a broken willow branch 5 feet off the ground. Further investigation revealed two more voles, hung like macabre Christmas ornaments. The shrikes were taking advantage of a good hunting spot and caching their prey for later use—a brutal bird behavior, perhaps, but a highly effective way to ensure a steady food supply for their young.
How Do Birds Remember Hiding Spots?
With some birds using hundreds of caches, the memory required to find what’s been stored is no small thing. Some species, the chickadees and titmice in particular, have a straightforward physiological response to the need for memory: Their brains grow. The hippocampus, the portion of the brain responsible for memory, increases in size in these species during the autumn and winter and then decreases in spring and summer. Other caching species don’t share this amazing capacity. Researchers hypothesize that these birds don’t actually recall all the food locations; instead, they simply stock their territory, then “reforage” for their caches during the winter.
Brainy birds: Meet America’s smartest bird species.
Whether it’s jays caching peanuts in the eaves of a house or the gory prey of northern shrikes, food storage is fascinating. But most compelling to me is the chickadee’s astounding memory. Thousands of seeds hidden about the forest, and each is recalled, thanks to a seasonally growing brain. It also makes me grateful that I don’t have to recall where I hid my food; I need only visit the grocery store. Now if only I could find my car keys.
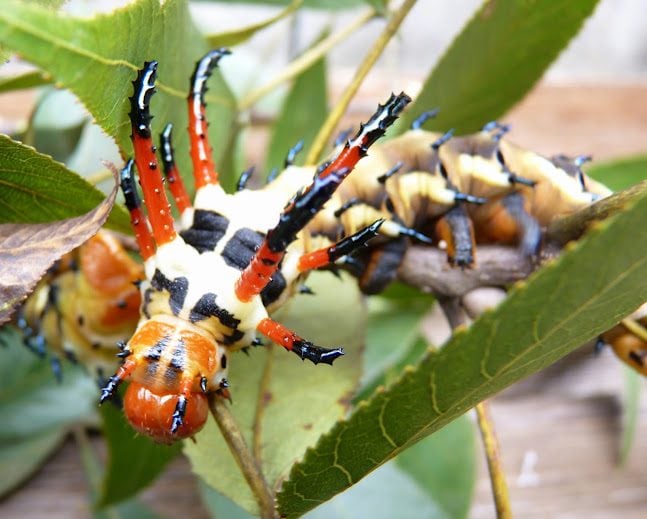
Happy October! The countdown to Halloween is on, and it’s time to celebrate spooky species including ravens, bats, spiders and more. First up, the hickory horned devil (Citheronia regalis), the larva of the regal moth. As assistant curator of a butterfly exhibit, I handle a lot of caterpillars on a regular basis, and I can easily say that none of them are quite as alarming on first sight as these freaky creatures.
Learn about garden moths: important pollinators.
Are Hickory Horned Devils Poisonous?
Despite the fearsome look of these caterpillars, they are actually entirely harmless to humans. For potential predators, though, their bright colors, huge eye-spots, and gigantic horns are a clear sign to stay away. After all, those horns look like quite a bit to swallow, and bright colors often signal toxicity in the animal world. And if that’s not enough, when disturbed these caterpillars will rear back and vibrate, creating a buzzing noise that’s startling in and of itself.
Oh, and did I mention that these caterpillars can grow up to six inches long, and get as fat as a hotdog? Their sheer size is enough to scare most people, even without the horns and spikes.
Plant a caterpillar cafe in your butterfly garden.

Facts about Hickory Horned Devil Caterpillars
- This species lives in the Eastern United States, from New York south to central Florida.
- As the name indicates, the caterpillar hosts on hickory, plus walnuts, persimmon, sycamore, sweet gums and a number of other trees.
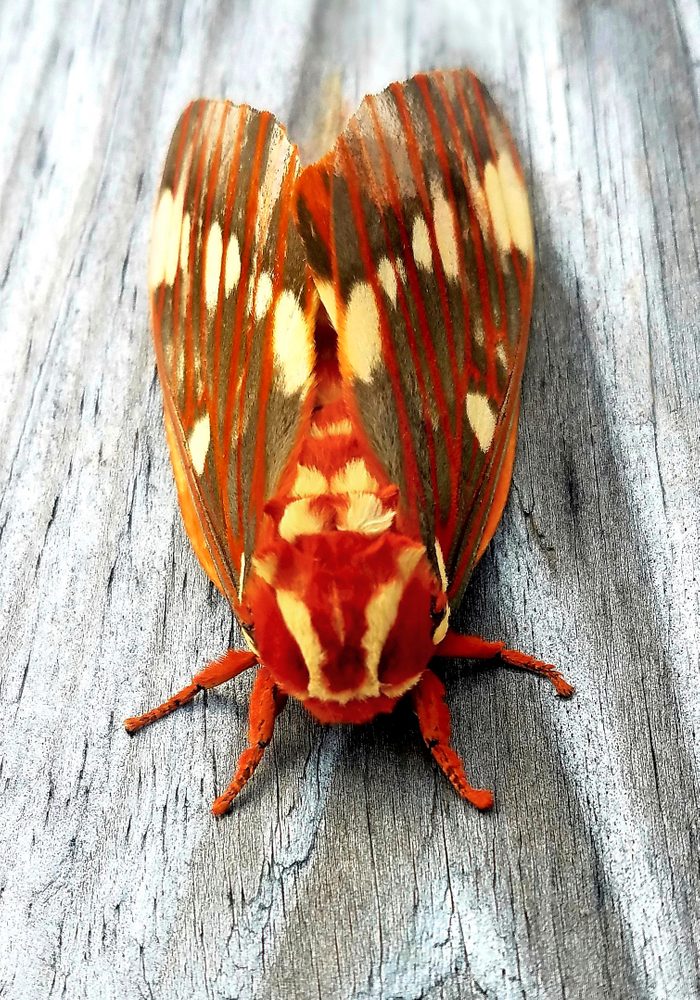
- The caterpillar pupates underground in an earthen chamber. They will remain there until the following spring. They they will emerge as the regal moth, sometimes also called the royal walnut moth.
- The adult moth is in the silk moth family, and does not feed—it actually has no mouth parts. It will live off its stored fat reserves for a few days while it mates, and then die very quickly.
- The regal moth is one of the largest moths in North America, with a wingspan of as much as 6 inches.
In the spirit of spooky season, check out these black birds that are always dressed for Halloween.
Check out these pictures that will change the way you look at moths.
There are plenty of other freaky caterpillars out there (tomato hornworms and flannel moths come to mind). But these are the craziest I’ve ever personally come into contact with.
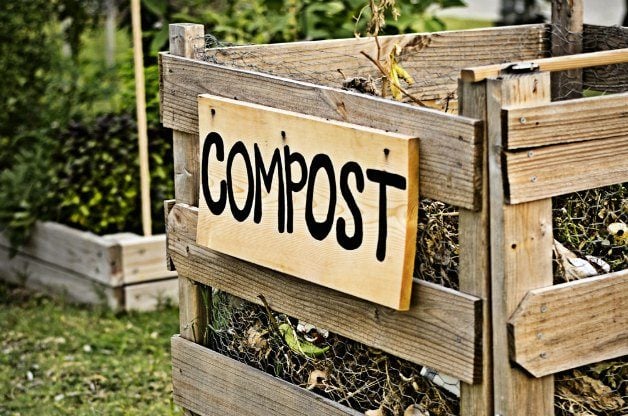
Compost is a fantastic way to give your plants a nutritional boost. And although maintaining a batch is second nature to some gardeners during the growing season, most take a break in winter. But composting doesn’t have to stop when the mercury drops. “It’s perfectly fine to compost throughout the entire year. It is realistic for most gardeners if they pay attention to the compost bin on a regular basis,” says composting expert Beth Clawson, an educator with the Michigan State University Extension. “Composting still occurs even in the coldest months—it just occurs at a much slower rate, as different organisms are active and act more slowly.” Here’s how to make compost year-round.
Step 1: Getting Started Making Compost
Consider both aesthetics and function as you look for an area in your yard to store compost. The area should be convenient for adding materials and removing the compost. But you don’t want it to detract from the beauty of your (or your neighbor’s) landscape. Make sure the pile is located on a level, well-drained area. Also, locate the pile close to the garden hose so you can moisten it during dry periods.
Some people build their compost piles on raised planks or platforms. “It’s not necessary, though—compost can be built straight on the ground,” Beth says. “There is no need to prop it up on anything unless you want to.”
Aim for a 3-by-3-by 3-foot pile at minimum. Bigger is better for generating some heat, especially in winter. If you have an active compost heap and you turn it regularly and keep it hot, the pile won’t freeze and will continue to compost at a reasonable rate, Beth says. She adds, “It is very common to see compost piles steaming in the middle of winter. You must be willing to go out in your coat and boots and do the work.”
Learn how to build a DIY compost bin.
Step 2: Water and Shelter
Composting works in both sun and shade, but warm sunlight speeds up the decomposition process. Beth recommends keeping compost out of wind and sun by either placing your bin in a shadier spot or draping it with a cover. “Another thing you should keep in mind is to always keep compost moist,” Beth says. “It’s the moisture that allows organisms to live and it’s the organisms, like bacteria, microbes and insects, that do the work.”
Drainage is just as important. Poorly drained sites result in waterlogged piles that decompose slowly and tend to smell bad. If drainage is an issue, build your pile on top of a screen-covered wood pallet. You also can dig a shallow hole and lay wood or metal supports across it to hold screening. Then set the pile on top of the screen.
Learn more about getting started with vermicomposting.
Step 3: Compost Layers

Make a pile using the ratio of 4 parts brown material, such as straw, leaves or shredded newspaper, to 1 part green, which could include kitchen scraps, coffee grounds and tea bags. Layer the materials and toss in compost from a friend or a few shovels’ worth of soil to introduce more beneficial microbes. Add sticks, corn cobs and other bulky materials to increase circulation.
Psst—check out the fall garden chores you should never skip.
Step 4: How Often to Turn Compost

Every time you add material, mix it with a garden fork. Be sure to move less decomposed matter to the center of the pile. Also, poke air holes into the compost pile with a broom handle. A compost chimney of PVC pipe with several holes drilled in it also works well. Just stack your materials around the pipe.
Learn everything you need to know about mulch.
Step 5: How Long Does It Take to Make Compost?
It can take 3 months to 2 years to make finished compost. The more attention you give the pile (frequent turnings, proper ingredients, maintaining proper moisture, etc.), the faster it breaks down. When the composting process is finished, the dark rich treasure at the bottom will crumble in your hands and help your garden thrive.
Discover 25 secret garden tips we learned from grandma.
Passive Composting in Winter
If composting in cold weather seems like too much work, Beth Clawson, an expert with Michigan State University Extension, offers a more laid-back approach. “I give it a good turn in the late fall, add scraps and a topping of leaves and grass saved from the summer I set aside for that purpose, and turn again in the early spring to get it going again,” she says. “It takes longer for a finished product, but I am not in a hurry.”
Here’s how to prepare your garden for winter in two days.
Compost Green Brown Ratio
“Equal parts of green and brown help to break the compost down” is a good basic how-to gardening guide. If your compost has an ammonia odor, you need more carbon-rich brown debris. If it isn’t decomposing fast enough, you can add more nitrogen-rich green debris. Here are common sources of green and brown debris, and the ingredients you should never add to your pile.
Green Waste (Nitrogen)
- Fruit wastes
- Spent annuals
- Grass clippings (free of weedkillers)
- Manure
- Seaweed and kelp
- Vegetable peelings
- Coffee grounds
Brown Waste (Carbon)
- Cornstalks and cobs
- Evergreen needles
- Paper
- Sawdust and wood chips
- Straw and hay
- Tree leaves
What NOT to Compost
- Disease- and insect-infested plants
- Charcoal ashes
- Fabric
- Grass clippings treated with weed killer
- Meat, fish, bones, egg whites or yolks, and fats
- Pet, bird and human waste
- Perennial weeds that can take root in the compost (bindweed, quack)
- Weeds gone to seed
- Invasive weeds
Next, check out 7 tips for growing a healthy lawn.
The volume of choices available when you start looking at bird field guides can be extremely overwhelming. How in the world are beginning birders supposed to know which of the dozens of field guides and bird books that are available will be best to help you learn about birds? Answer a few questions and you will be much more prepared to select the best bird field guide for you.
First, do you prefer field guides with photos or with drawings? Everyone seems to have a strong preference toward one or the other. Second, what region would you like the guide to cover? Is covering just the eastern or western part of North America good enough, or would you like a bird book that covers every species you might find in the whole country? Or possibly you’ll prefer a guide specific to your state or region, such as the Kaufman Field Guide to Nature of the Midwest, or even a hummingbird field guide.
No matter which field guide or bird book you choose, I highly recommend that you read the introduction chapters before diving into the more fun images of the birds. There’s an incredible amount of info that can be learned by reading the introductions to these books. You’ll learn how to use the field guide, bird identification tips, and how to understand the range maps.
1. The Kaufman Field Guide to Birds of North America
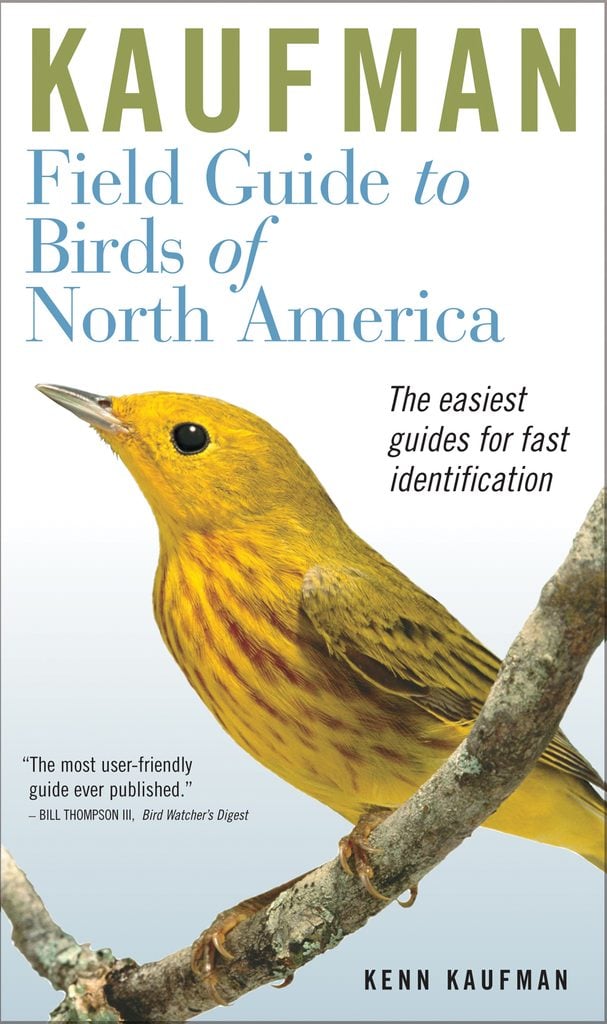
This is the best field guide to the birds in North America for beginning birders in my opinion. The book is laid out in a way that really helps you find birds in the book as well as learn them as you go. The pictorial table of contents makes pinpointing birds on your life list a cinch. It features photos of each species. The helpful text explains many of the key identification points in addition to other useful information such as habitat and nesting behavior. This is also the first field guide to the birds of North America that is translated into Spanish, Guia de Campo Kaufman a las Aves de Norteamericas.
2. The Sibley Guide to Birds
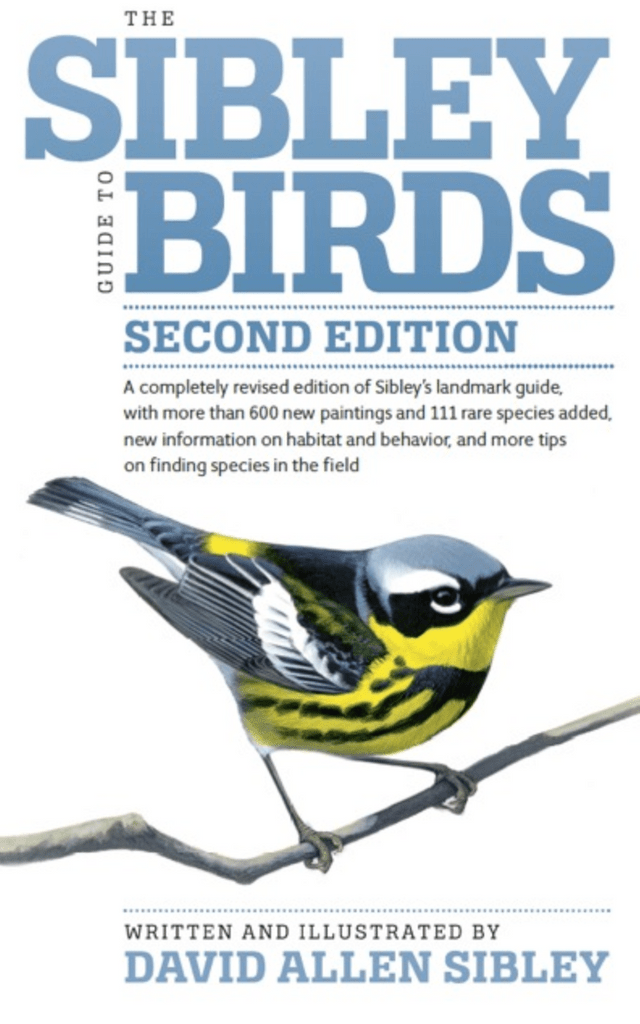
The Sibley Guide to Birds is definitely the best choice if you prefer drawings to photos. The drawings are very accurate and highlight all of the best identification points of each species. The text is also well written and extremely helpful for those that take the time to read it. This book is offered in three versions: North America, Eastern North America, and Western North America.
Check out our favorite hummingbird books for bird lovers.
3. The Peterson Field Guide to Birds
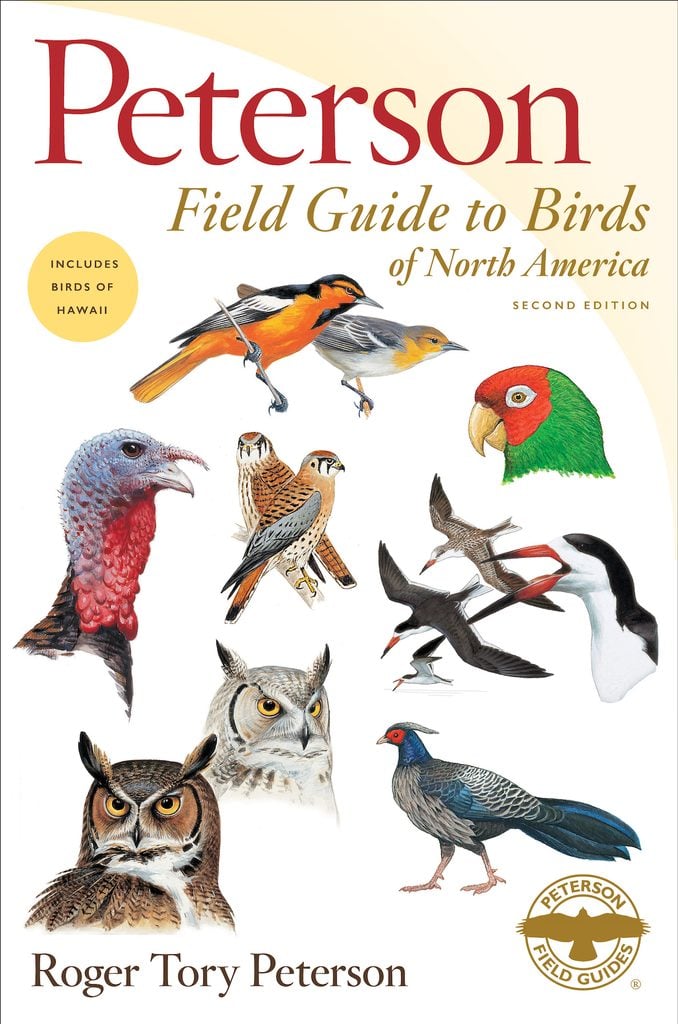
The Peterson Guide to Birds was the first good field guide in the United States when published in 1934. There have been many revisions and upgrades to this book over the years, and it’s still a very good field guide. The book also features drawings of bird species, but I personally prefer Sibley’s artwork. It’s also offered in three versions: North America, Eastern North America, and Western North America.
Check out more perfect gifts for bird lovers.
4. Best Field Guide for Young Birders
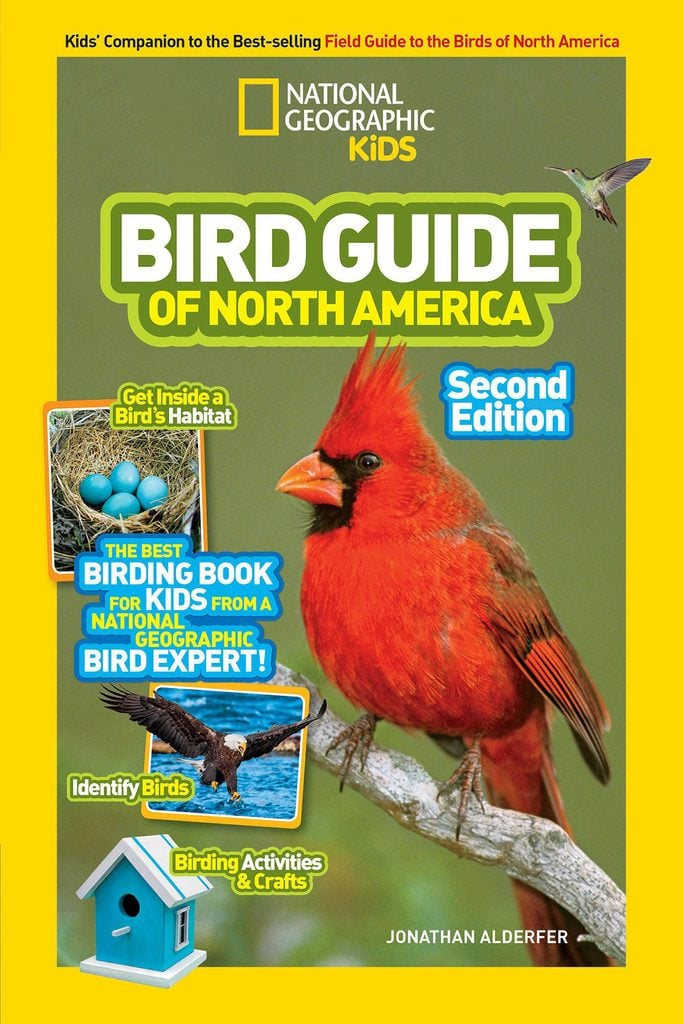
The National Geographic Kids Bird Guide of North America offers beautiful, full-color photos of common birds you can find right in your backyard and their habitats, plus fun facts presented in an easy-to-consume way. All of this is sure to get kids excited about birding. It comes in a handy paperback edition so kids can take it on the go.
We found more nature books for kids that make perfect gifts.
5. Birds of North America Book

If you want to take a very deep dive into the birding world, you’ll enjoy poring over Birds of North America by the National Audubon Society. This bird book is too heavy to carry along on a bird-watching trip, so it’s not a true portable field guide. But it has a vast amount of information about more than 800 species. Plus it has over 3,500 large color photos, range maps and tons of useful and interesting information about bird biology and behavior.
6. Peterson Field Guide to North American Bird Nests
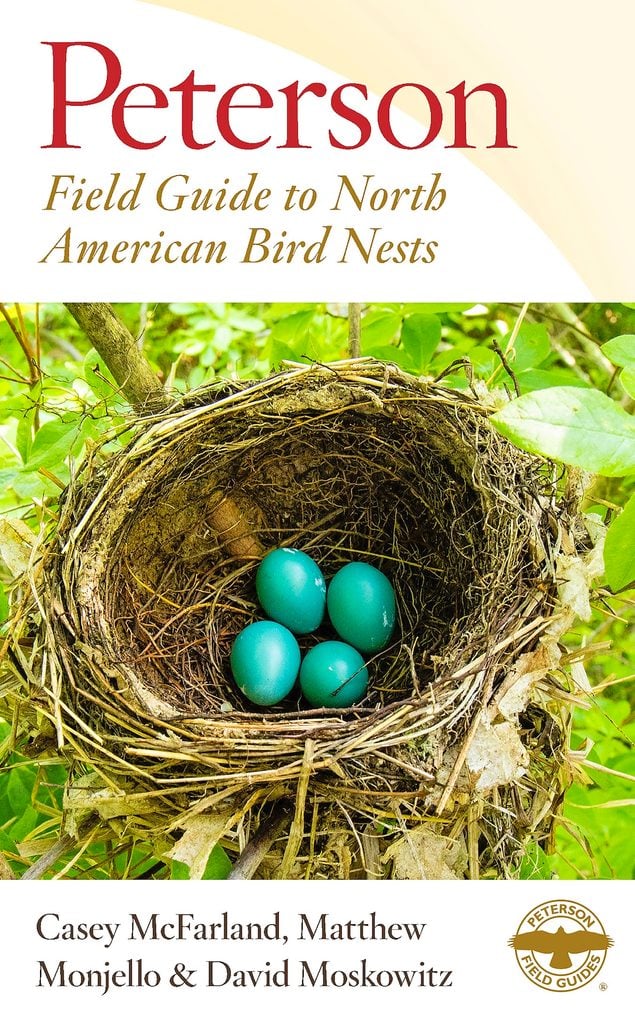
Get up close with fascinating nests in the Peterson Field Guide to North American Bird Nests. Learn about different species’ preferred habitats and breeding behaviors. This book will come in handy if you spot a nest with bird eggs in your yard.
Next, check out our binoculars buying guide.
Before you put your feet up and settle in for the garden off-season, dedicate a few days to getting your landscape tucked in tight. Follow these simple steps to tidy up, and you can finish preparing your garden for winter in just one weekend.
Day One (Morning): Trim Plants and Tidy the Garden

Divide your overgrown perennials and cut back the dead foliage on others. Remove any spent annuals and vegetables from the garden—roots and all—and add any disease-free debris to your compost pile. As you yank out plants and weeds, be mindful of pests and diseases. Double-bag and discard diseased plants or foliage.
“Some diseases and pests overwinter in plant debris,” says Melinda Myers, horticulture expert. “Remove them in fall to prevent infection next year.”
But not everything in your landscape needs to go. “Leave healthy perennials, such as purple coneflowers, black-eyed Susans, and native grasses—they provide habitat for beneficial insects, food for birds and interest for the winter landscape,” Melinda says.
Check out the top 10 fall flowers for a perennial garden.
Day One (Afternoon): Protect Your Garden and Prepare for Winter
Some plants and containers struggle in severe winter temps. Bring pots and non-hardy plants indoors or at least out of the elements. If you’re worried about the survival of plants or pots that must stay outdoors, wrap them in blankets or burlap. As an added measure when preparing your garden for winter, surround plants with wood chips or bags of potting mix to keep the roots snug and safe from the elements.
Cover the plant’s roots, too.“To avoid frost heaving—when the freezing and thawing of the soil shifts and pushes shallow-rooted perennials and bulbs out of the ground—apply evergreen boughs or weed-free straw around your perennial and bulb plantings after the ground freezes,” Melinda says. “This keeps the soil consistently cold even during a winter thaw.”
It’s also a good idea to nourish perennials and annuals by incorporating compost and shredded leaves. Newly planted trees and shrubs are especially vulnerable in the winter and need a little extra attention.
“Protect your garden from hungry animals by placing a cylinder of hardware cloth around (not touching) the trunk of young trees and shrubs,” Melinda says. “Sink it several inches into the soil to deter voles, and make sure it is at least 4-feet tall in order to keep rabbits away.”
Day Two: Plant for Spring and Maintain Tools

Once your landscape is all cleaned up, get a jump-start on next year’s garden and plant what you can now. Fall is a great time to plant trees, shrubs, perennials and bulbs. Simply make sure you get them in the ground before the soil gets too cold so roots have time to become established.
Also use this time to clean and sharpen garden tools, disinfect pots and make necessary repairs around the landscape. It will make your spring prep a breeze! With a yard that’s been perfectly prepped for the winter season, you can rest easy and cozy up for the cold months, dreaming about next year’s garden.
Bonus! 3 More Ways to Prepare Your Garden for Winter
- Divide and transplant some perennials. Hostas, peonies and early bloomers—such as coral bells, phlox, poppies and daisies— benefit from being thinned out.
- If you’re an avid veggie gardener or you think your soil will benefit from a dose of organic matter, sow a cover crop to protect and enrich the soil.
- Drain your garden hose and bring it in for winter. Wipe it with a rag to remove any mud and moisture, then store it flat in a dry, dark place.

Almost anyone with backyard bird feeders has had squirrel problems at one time or another. One hungry squirrel can clean out a feeder faster than you can say “black oil sunflower seed,” and that drives bird-lovers crazy. There are plenty of feeders out there that claim to be squirrel-proof or, perhaps more honestly, “squirrel-resistant.” But squirrels are creative acrobats and they love to eat sunflower seeds. In my Florida yard, I’ve made the switch to safflower seed to deter squirrels. Safflower seed is slightly more expensive, but the squirrels in my neighborhood are completely uninterested in eating it.
Discover how to tell 5 types of squirrels apart.
Now, I can’t promise this solution will work for everyone. Apparently squirrels in some areas think safflower seed is quite delicious, but for me it’s been very effective. Plenty of birds still enjoy eating safflower seed, and I save a lot of money by not needing to refill my feeders nearly as often.
Psst—here’s what to feed squirrels (and how to peacefully co-exist).
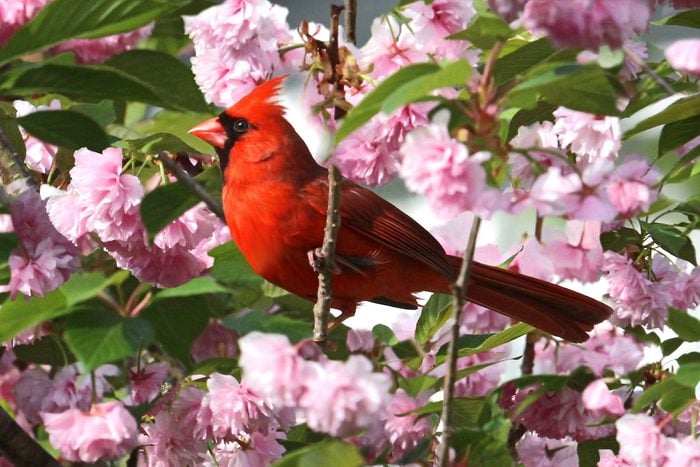
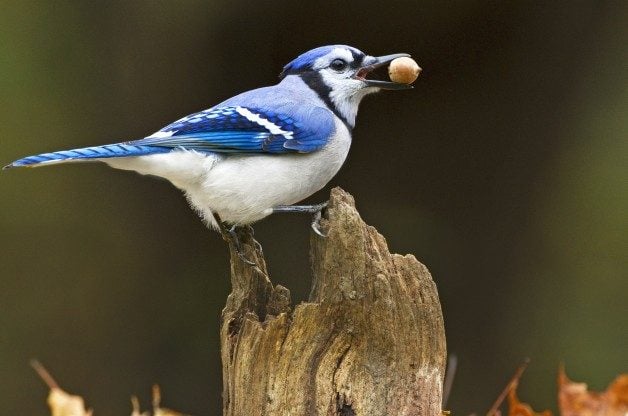
Birds That Eat Safflower Seed

- Blue Jay
- Chickadees
- Grosbeaks
- Northern Cardinal
- Mourning Dove
- Tufted Titmouse
- Downy Woodpecker
- Purple Finch
- Yellow-Rumped Warbler
- Red-Bellied Woodpecker
I’m a down-and-dirty kind of gardener. When I see women in garden magazines or movies wearing wide-brimmed garden hats with bows, a neat apron around their waists and pristine gardening gloves, I always think, “Oh, come on! That’s not real gardening!” In my world, gardening involves dirty fingernails and dirty knees, grass stains and muddy cuffs, and an old hat faded by sweat and streaked with soil. But there is one gardening chore that doesn’t have to involve sweat in the eyes and an aching back. Deadheading flowers is a task you can usually do without getting dirty. You can squeeze it in even if you only have a few minutes to spare. In fact, one of my favorite times to deadhead is when I’m on the phone with my mom. It’s easy, it’s fast, and—most importantly—it really makes a difference.
Deadheading Flowers: Why It Matters
When I asked other gardeners why they think deadheading is important, they listed three main reasons:
Flowers bloom better and longer. When a flower fades and petals drop off, plants know the time has come to produce seeds. This is the main goal of a plant—to reproduce. The flowers are just the beautiful lure they use to draw in pollinators. So once the flower is done, plants throw all their energy into turning that flower head into a seed head. This is especially true of annuals that only bloom once a season. Deadheading allows gardeners to “fool” the plant into flowering again, since they have no seed heads to grow.
Flower gardens look tidier. Dead flower heads are often just plain unattractive. Removing them makes your garden look neater immediately, even if a few weeds are still lurking nearby.
Deadheading flowers keeps aggressive plants in check. Plants are usually determined to spread their seed far and wide. Sometimes that’s not especially welcome in more cultivated flower gardens. By trimming flower heads before they have a chance to produce seeds, you can keep more aggressive plants from re-seeding and taking over.
Deadheading your flowers helps you monitor for problems. Here in Florida, summer is not the time to spend hours in the garden. The hot sun and humid temperatures wilt even the strongest gardeners in just a few minutes. Sometimes a week or two will go by and I realize I really haven’t looked closely at my gardens at all. So, once the sun has set, I’ll walk around for a few minutes in the (relative) cool of the evening, snipping deadheads and checking my plants for any signs of disease or pests. I also look for new blooms and growth I otherwise might have missed the chance to enjoy.
Flower Deadheading Tips
Deadheading flowers is pretty easy, but here are a few things to remember to make it worth your time.
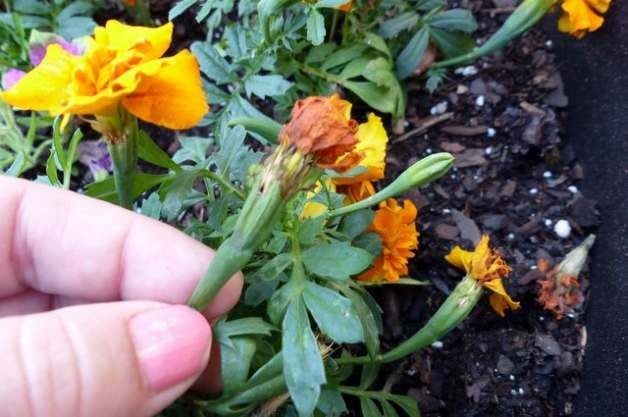
- Remove the whole flower head, not just the dead petals. Remember, once the petals are gone, the plant will start putting energy into turning that flower head into a seed head. Snip off the whole thing to stop that process. (Look closely though. Some plants will start another bud directly next to the first one on the stem. Be sure you’re not removing new buds as well as dead flowers.)
- Carry a small pair of scissors. Some flowers are very easy to snap off by hand, like marigolds, but others have tougher stems. A pair of small sharp scissors will make a clean cut, reducing the area for disease to get into your plant.
- Tuck a bag in your pocket. If you’re focused on keeping your garden tidy, or want to make sure you are keeping aggressive plants under control, throw the deadheads into a small bag to dispose of later. If you’re not worried about that, though, you can just drop the deadheads on the ground around the plant.
When you’re ready for your plants to produce seeds, be sure to leave a few deadheads on your plants so the process can get going. If you feel the need to tidy up, you can pull off the dead petals, but leave the flower heads there to become seed heads.